

Some Simple Smart Home Automation Ideas

Last Updated: 10/20/2026
This page summarizes some home automation ideas I have considered; most (perhaps all) are relatively simple and require no coding in SmartThings. While many have been implemented, some are still on a to-do list and have been listed anyway because they seem interesting. The implemented automations were created using the SmartThings Android App's graphical routine creation interface, which can be accessed by tapping the "+" icon and selecting the "device" or "scene" option. Thus, many of the automation descriptions include a screenshot of this page.
The section below lists these automations. By default, the complete list is presented, organized based on the primary triggering sensor/event. The automation list can be filtered by trigger sensor/event using the checkboxes to the right. One or more checkboxes can be selected. More than a few automations use various conditions to trigger an action or a sequence of actions, and in some cases, an automation can be implemented more than one way, possibly using different sensors to initiate the action.
Simple Timer On-Off Light
10
Trigger Type:
Time-Date
(D)
Use a timer/clock to determine when to turn on or turn off a light.
Perhaps the simplest automations is turning a light on or off at a specific time. Even though it's simple, if there are lights used on a reasonably regular schedule, setting up a time-based automation makes sense.
Figure 1 shows the routine to turn on the light.
Trigger (if): A specific time. In this example, when the time is 30 minutes before Sunset, perform the action.
Action (then): Turn on all the Family Room Lights.
Figure 2 shows the routine to turn off the light.
Trigger (if): A specific time. In this example, perform the action at 10:45 PM.
Action (then): Turn off all the Family Room Lights.
We always use the Family room at night, so automatically turning on the lights as it gets dark makes sense. Similarly, we go to bed around the same time, so setting a fixed time to turn off the lights also makes sense. The only time it becomes a problem is when we have guests, stay up later, and the lights go off. (To fix this, a motion/presence sensor could be used to detect occupancy, improving the automation.)

Figure 1 Time-Based Light "On" Automation

Figure 2 Time-Based Light "Off" Automation
Virtual Multi-Switch
12
Trigger Type:
Manual
(D)
Manually turning on/off one light switch also turns on/off a group of related lights.
Suppose there are multiple separate lights spread around a large room. Usually, in a room, there is one light switch connected to one outlet (or ceiling light). This automation (again, a straightforward routine) turns on "other" lights in the room when the main switched lights are turned on.
Trigger (if): When the ceiling (recessed) lights are turned on, trigger the "On" automation (Figure 1), and when the ceiling (recessed) light switch is turned off, trigger the "Off" automation (Figure 2).
Action (then): The action is to turn on (Figure 1) or turn off (Figure 2) the two sets of table lamps in each of the two routines shown.
While these routines have simple triggers and actions, their execution on the SmartThings hub is noticeably slow. Instead of all the lights turning on or off at once, there is a noticeable lag between flipping the main switch and when the lamps turn on (or off). This seems to be due to processing delays within the hub. The result is that the switch lights turn off first, followed by one set of table lamps a second later, and then the third set of lights another second later.
It may be possible to address the latency issues with this automation by using Z-Wave Direct Association. Unfortunately, there are limitations and complexities when implementing this feature that make it unintuitive to use in SmartThings, so it has not been implemented.

Figure 1 Using a Light Switch to turn ON 3 lights

Figure 2 Using a Light Switch to turn OFF 3 lights
Shower Fan Control
14
Trigger Type:
Humidity
(D)
Run the bathroom fan automatically based on humidity levels.
This automation consists of two routines: one to turn on the fan (or multiple fans) automatically and a second to turn it off automatically. This started out as a relatively simple automation, requiring (obviously) a humidity sensor, in this case, a Zooz ZEN44. The relay switch section of the Zooz ZEN30 provides the fan control.
The "On" automation is:
Trigger (if): If the humidity exceeds a certain amount. (no other conditions)
Action (Then): Turn on the two fans.
The "Off" automation is:
Trigger (if): If the humidity drops below a certain amount, but only if the fan is already on.
Action (Then): Turn off both fans.
The "Off" automation could potentially have a couple of unintended side effects.
One is that if the fan is manually turned on while the humidity level is low, then the off automation could execute when not desired. Fortunately, there is really no other reason to turn on the shower fan.
Without the condition to only trigger when the fan is already on, it is possible that anytime the fan is off and the humidity is low, the "Off" automation could continuously trigger.

Figure 1. Too Humid, Turn-On Bathroom Fans.

Figure 2. Not Humid, Turn-Off Bathroom Fans.
Leak Detection
16
Trigger Type:
Leak
(P)
Send a notification and/or shut off the water when a leak is detected.
This is a straightforward automation that follows a basic flow, where a Boolean sensor toggles on and off (like a switch).
Trigger (If): Again, very simple, if the leak detector indicates that it is wet, trigger.
Action (Then): What would be really interesting is if I had a smart valve controller that could turn off the water if a leak were detected, but alas, I do not. So the next best thing is to send out a notification and, to be sure, a text message to someone so they can race home and turn off the appropriate valve.


Geofencing Set Up
20
Trigger Type:
Location
(D)
Not an automation, but a necessary setup to enable SmartThings location-based automations.
There are several steps to enabling the location tracking. First, we need to ensure the phone is set up to provide its location to SmartThings.
In the SmartThings App, tap the Menu (three horizontal lines, at the bottom right).
Tap the Settings gear icon (⚙).
Enable the option "Get your location from this phone" (yellow oval in Figure 1).
In Android Settings, grant the SmartThings app "Always Allow" location permission to ensure continuous detection. (not shown)
Normally, when the App is initially set up, a user will set the default "My Home" location, and the home address is set. With a simple single-location setup (as I have), the default geofence location and radius are probably correct. Still, one can adjust the location and radius in one of two ways. Option 1 is:
From the "Get your location from this phone" page (yellow box, Figure 1), tap the location (orange oval).
A map page appears, and the user can drag the map to change the location.
The radius slider at the bottom of the page can also be adjusted.

Figure 1. Getting the Location from the Phone

Figure 2. Managing Locations
Leave Home (One Person)
21
Trigger Type:
Location
(D)
After a person leaves the house, close the garage door, (possibly) adjust the lighting, door locks.
The automation described here is a relatively simple version of a "Leave Home" routine. In this automation, when one person (me) is detected leaving Home, close the garage door. More complex versions of this could, for example, include turning off the garage lights. Another permutation of this automation is to run a routine when everyone has left the house, ensuring the house is locked, all the lights are out, and, if linked to SmartThings, enabling an alarm.
Trigger Condition (If): The first part of the condition checks the door sensor to ensure the routine runs only if the door is open. The next part of the trigger uses the SmartThings App, which provides a couple of "Leave" options as shown in Figure 2. This automation triggers when a specific person leaves, so it is set to "Every time anyone leaves," and then by touching the icon to the left, one can select which person (or people) will trigger the action. (Note: Leave detection triggers when the designated person leaves the designated region, which for SmartThings defaults to a 200M circle around the house)
Action (Then): The desired action is to close the garage door when the selected person leaves the house. The setup to control the garage door is described in "Basic Garage Door Control". The action is to toggle (turn off, then on) the garage opener relay to close the door. This programming is shown in the bottom half of Figure 1.
This automation is intended for short-term absences from a house with multiple occupants. While it was possible to add more actions, it was decided that additional actions (such as adjusting the lighting, locking the house, and turning down the thermostat) are best left for separate automations (for example, when everyone has left, or a vacation automation).

Figure 1. Simple Leave Home Automation

Figure 2. The location trigger condition Options
Arrive Home (One Person)
22
Trigger Type:
Location
(D)
Upon arrival, open the Garage Door and (possibly) Perform More Actions.
This automation is essentially the reverse trigger of the "Leave" automation, but the same action. When the designated person enters the geo-location region (ie, coming home), then open that person's garage door.
Trigger Condition (If): The first part of the condition checks the door sensor to ensure the routine runs only if the door is open. The next part of the trigger uses the SmartThings App's geo-location, which provides several "Arrive" options, as shown in Figure 2. For this automation, the trigger "Every time anyone leaves" is the desired option, and by tapping the icon to the left, one can select which person (or people) will trigger the action. A couple of sub-options that affect trigger behavior are: (a) "After being away . . ." set to 5 minutes to avoid multiple triggers; (b) "Stays this status . . . " not set (hopefully defaulting to zero) so that this trigger happens as quickly as possible.
Action (Then): Open the garage door when the selected person arrives. The setup to control the garage door is described in "Basic Garage Door Control". The action is to toggle (turn off, then on) the garage opener relay to close the door. This programming is shown in the bottom half of Figure 1.
(Note: Similar to the Leave detection, the Arrive detection triggers when the designated person enters the assigned region.)
This automation is intended for short-term absences from a house with multiple occupants and is a companion to the "Arrive" automation. Thus, the action is essentially the same as "Arrive," and it only activates the garage door.

Figure 1

Figure 2
Set Up a Vacation Mode
24
Trigger Type:
Location
(D)
Change the behavior of specific lights and other items when the house is unoccupied for >24 hours.
A vacation schedule is not a single automation but rather a "mode" that affects the schedules of possibly multiple items throughout the house. SmartThings implements a "Location Mode" with set values "Home", "Away", or "Night", but does not inherently do anything. Before "Location Mode" can be used, one must define how to set the mode and create routines controlled by "Location Mode". e.g., "Away" could be triggered when one person is away from home (e.g., shopping), or when the family has been away for a day (on vacation). Alternatively, the same functionality can also be implemented using a (third-party) Virtual Switch, which can be turned on or off based on the same triggers.
Whether using SmartThings' "Location Mode" or a virtual switch for vacation routines, the first consideration is how to trigger a mode change. A couple of trigger approaches were considered:
Geolocation: Use geolocation to determine when no one is home (which means everyone at home needs a phone with the SmartThings App) and to detect when it's a vacation (for example, no one home for 24 hours). Returning can be triggered when anyone returns home. The geolocation and trigger setup is similar to the "Leave" and "Arrive" automations described earlier. An added complication is that if HVAC is included in the routines, the return trigger should occur several hours before the return to preheat the house.
Manual: Usually, one does not go on vacation very often, so a simple trigger is to create a virtual switch using an add-on like vEdge Creator (Edge Driver). This add-on can create a virtual switch in SmartThings. By using this switch as a condition in all vacation automations, a vacation mode can be started manually by turning on the virtual switch in the App. The vacation mode could be linked to a physical switch (e.g., a remote button).
For this implementation, I chose to use a virtual switch. The reasons for this less automated approach are: a) Easier to implement. b) The manual effort is minimal. c) Ecobee-SmartThings integration does not allow control of Ecobee's vacation mode. d) The only vacation mode actions are for lighting control.
Figure 1 shows a virtual switch (yellow circle) created using vEdge Creator (light blue circle). The virtual switch functions like a standard on-off switch. Figure 2 shows the list of routines enabled by vacation mode. These routines are described in more detail in a separate Vacation Timers note.

Figure 1. A Virtual Switch in SmartThings

Figure 2 A List of Some Lighting Automations
Vacation Lighting Examples
25
Trigger Type:
Time-Date
(D)
Use time-of-day to turn on/off Lights
The first disappointment is that SmartThings lacks a built-in way to randomize a routine's trigger time. This could be worked around by creating multiple routines that run on different days of the week, each with a different hard-coded start time. I did not bother to do this for a couple of reasons. 1) Most of the general living area lights and all outside lights are already on sunset or fixed-time timers. 2) For the few lights that made sense to add to a vacation mode, I was too lazy to create multiple routines.

Figure 1 Routine to Change Location Mode
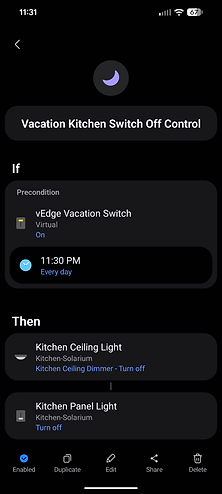
Figure 2 Example Vacation-Timer Automation
Basic Garage Door Control
30
Trigger Type:
Manual
(D)
Basic Door Open/Close Routine When App Button Pressed
Most older garage door openers feature a mechanical momentary button that activates the door. To enable control via SmartThings, a minor hardware modification is needed: installing a smart dry-contact relay in parallel with the garage door's main control switch. Back when this was implemented, Z-Wave dry-contact relays were more prevalent and used. The relay is essential because it simulates a simple push-button press; unlike a typical light switch that switches line voltage, the relay mimics a momentary push. Figure 1 illustrates the basic connection. Additionally, the relay requires power for its controller, so it is plugged into an AC outlet next to the garage opener.
At the bottom-right of Figure 1, a small graphic of the top of a garage door is shown. The door has a tilt sensor that indicates whether the door is open or closed. The normal button behavior when pushed is to open a closed garage or close an open garage (a toggle). Often, it is useful to know whether the door is open or closed before pushing the button. In those situations, the tilt sensor state can be used to determine whether the button should be activated. The tilt sensor is not used for this simple automation, but there are many situations where knowing the door's state is necessary.
A relay acts like a toggle switch, so to mimic a monetary switch, whenever SmartThings senses the switch is closed, it needs to open it again. This automation is intended to run when the user turns on the garage door relay button in the App. Doing so causes the automation to immediately "release the push-button." The automation will also run when triggered via voice activation or geo-location.

Figure 1 Adding a Smart Relay for Garage Control

Figure 2 App Button Garage Door Routine
Motion Detection Activates Closet Light
31
Trigger Type:
Motion
(B)
Use motion detection to turn on a light when a person enters the room.
This is a very simple automation that requires a motion sensor (e.g., Zooz ZSE18 or Aquara P1) and a smart light switch or dimmer. The simplest flow is to have the motion sensor trigger an action, such as turning on a light. In general, additional conditions can be added, such as turning on the light only at night or depending on the status of other sensors in the room. In this case, since the closet has no windows and no other sensors, the automation to turn the closet light ON is trivial.
Trigger (if): Motion is detected by a motion sensor.
Action (then): Turn on the light.
If the situation were to control the lights in a living room, then it makes sense to qualify the automation with Sunset. If the room also had smart blinds, they could be added as part of the action, or more likely, as a separate automation.
At some point in the future, I'll add some examples of slightly more complex Trigger conditions.

Figure 1 Simple Motion Senor Triggering a Light

Motion Detection Deactivate Closet Light
32
Trigger Type:
Motion
(B)
Use a motion sensor to turn off a closet light
When it comes to simple motion detectors, determining whether someone has left the room is problematic. Motion detectors are not good at distinguishing between someone sitting still and someone who has left. (More expensive mmWave presence sensors can differentiate this.) The most common method is to use a time interval during which no motion is detected to decide (approximately) that the room has been vacated.
Turn lights OFF:
Trigger (if): Motion is NOT detected by a sensor for a specific amount of time, for example, 10 minutes.
Action (then): Turn off all of the lights in the room.
If there are other sensors in the room that could help determine occpancy these could be added to the "Lights Off

Figure 1 Using a Motion Sensor to Turn Off a Light
Remote Button/Scene Controller
36
Trigger Type:
Manual
(B)
Program a standalone button (or buttons) to control lights, etc.
This is some place holder text while I am creating a more detailed description of the home automation.


Voice Commands
37
Trigger Type:
Manual
(B)
Use Alexa to turn on/off light switches
This is some place holder text while I am creating a more detailed description of the home automation.
Movie Mode Lighting
41
Trigger Type:
Manual
(B)
Dim the lights, close the blinds, and adjust the thermostat when the specific media player starts.
This is some place holder text while I am creating a more detailed description of the home automation.
Panic Button
42
Trigger Type:
Manual
(B)
Trigger all lights on, unlock doors, and sound the alarm with a designated button press.
This is some place holder text while I am creating a more detailed description of the home automation.
Morning Routine
42
Trigger Type:
Motion
(B)
Gradually increase bedroom light brightness, adjust thermostat, start coffee at wake time.
This is some place holder text while I am creating a more detailed description of the home automation.
Mailbox Alert
46
Trigger Type:
Motion
(B)
Notify when the mailbox contact sensor opens or motion sensor triggers during the daytime.
This is some place holder text while I am creating a more detailed description of the home automation.
Mailbox Alert
50
Trigger Type:
Open-Close
(B)
Notify when the mailbox contact sensor opens or motion sensor triggers during the daytime.
This is some place holder text while I am creating a more detailed description of the home automation.
Window Open Alert
52
Trigger Type:
Open-Close
(B)
Notify if windows are left open when HVAC starts or when rain is detected.
This is some place holder text while I am creating a more detailed description of the home automation.
Door Entry Light
53
Trigger Type:
Open-Close
(B)
Turn on room lights when the door opens at night.
This is some place holder text while I am creating a more detailed description of the home automation.
Door Open Warning
54
Trigger Type:
Open-Close
(B)
Send alert if exterior door stays open >60 seconds.
This is some place holder text while I am creating a more detailed description of the home automation.
Appliance Power Monitor
60
Trigger Type:
Power Monitor
(B)
Alert when dishwasher or washing machine completes cycle based on power draw.
This is some place holder text while I am creating a more detailed description of the home automation.
TV/Media Room Lighting
61
Trigger Type:
Power Monitor
(B)
Detect the TV power to adjust the lighting for watching TV at night.
This is some place holder text while I am creating a more detailed description of the home automation.
Laundry done notication
62
Trigger Type:
Power Monitor
(B)
Detect washer/dryer vibration or a change in power usage state and send an alert.
This is some place holder text while I am creating a more detailed description of the home automation.
Movie Mode Lighting
63
Trigger Type:
Power Monitor
(B)
Dim the lights, close the blinds, and adjust the thermostat when the specific media player starts.
This is some place holder text while I am creating a more detailed description of the home automation.
Close Garage Door at Night
70
Trigger Type:
Time-Date
(D)
At night, if the door is open at a specific time, close it.
This is placeholder text while I create a more detailed description of the home automation.
If we are working outside and leave the garage door open, annoyingly, we sometimes forget to close it at night. Fortunately, since each garage door has a tilt sensor, a simple time-based automation can be created (Figure 1). The trigger condition is at a specified time; check whether the garage door/tilt sense is open. If it is, run the routing to close the door, which toggles the garage door opener button on and then off. It is useful to note that the delay step is not needed, but it seemed "safer" to include it. Also, the final step is unnecessary because there is a separate routine that automatically turns the switch off when it is detected to be on. Again, it seemed "safer" to include it to keep all the functionality in one routine, and if the other routine was disabled for some reason, the door would still close.
This automation, as written, has a slight chance of closing on someone if that person is in the garage at the specified time. To avoid this, one could add a motion detector or presence sensor to the garage and set the trigger to "no motion." In practice, one should pick a time when this is very unlikely to happen; thus, to me, it is not really a problem.

Figure 1 Close Garage at Specified Time(s)

Morning Routine
72
Trigger Type:
Time-Date
(B)
Gradually increase bedroom light brightness, adjust thermostat, start coffee at wake time.
This is some place holder text while I am creating a more detailed description of the home automation.

Porch Light Schedule
73
Trigger Type:
Time-Date
(B)
Turn on at sunset, off at sunrise, with brightness adjustment based on ambient light.
This is some place holder text while I am creating a more detailed description of the home automation.
Night Light Activation
77
Trigger Type:
Time-Date
(B)
Use time-of-day or presence to turn on ambient night light
This is some place holder text while I am creating a more detailed description of the home automation.
Night Mode
78
Trigger Type:
Time-Date
(B)
Alter house lights based on time and motion.
This is some place holder text while I am creating a more detailed description of the home automation.
Bedtime Routine
79
Trigger Type:
Time-Date
(B)
Lock doors, lower thermostat, turn off lights, and arm security at the scheduled time.
This is some place holder text while I am creating a more detailed description of the home automation.
Laundry Washer-Dryer Reminder
90
Trigger Type:
Vibration
(B)
Alert if the washer finishes but the dryer hasn't started within the time period.
This is some place holder text while I am creating a more detailed description of the home automation.
Laundry Dryer Done Notification
91
Trigger Type:
Vibration
(B)
Detect washer/dryer vibration or a change in power usage state and send an alert.
This is some place holder text while I am creating a more detailed description of the home automation.