

Initial Clean-Up of Digitized Album
Last Updated: 03/19/2025
Clean-Up Overview
Typically, the digitization process aims to produce one set of MP3, FLAC, or WAV files for each song. A series of steps is taken to digitize an album in Audacity. As an overview, I divide the process into three parts.
The first part involves basic optimizations and saving an intermediate file. The steps are:
-
Listen for any significant clicks or pops. Then, use the Repair function to remove them, focusing on those that exceed the normal recording volume. Alternatively, if numerous clicks and pops exist, the Click Removal tool can be used instead.
-
Delete any extra lead-in (from the start of the recording to the first song) or lead-out (from the end of the last song to the recording's end).
-
Optionally, Silence the lead-in and lead-out. (This could be done later.)
-
Normalize the audio. This process maximizes the recording volume without clipping the audio.
-
Save the audio as a native Audacity project file (working copy) and a 32-bit float format WAV file (backup copy). The WAV file is typically recommended as a good backup when using a 32-bit floating point sample format, since it has the same sample accuracy as an Audacity file.
For part 2, use Audacity tools to perform as much clean-up as possible (or until one gets tired of working on the file). The primary tools to utilize are:
-
Click Removal: This effect removes clicks from a selected range of an audio track, making it ideal for many clicks in a section of a vinyl recording.
-
Noise Reduction: This effect can help reduce background noise, such as hiss or hum, that may be present in the recording.
-
Repair: This effect fixes individual clicks and pops. It can be used alone or when the Click Removal tool does not effectively eliminate all clicks.
-
Generate Silence: One can manually silence sections with clicks, pops, or noise. Another similar but different tool is Delete, which removes a section of audio. Both tools are usually applied to recorded sections containing only background noise.
-
High Pass Filter: This helps remove low-frequency rumble and hum that record warps can cause.
Then, part 3 is about preparing for song export and exporting.
-
Metadata Editor: Insert metadata about the album, artist, etc.
-
Labels: Insert labels at the time positions to mark each song's beginning and end times. Name the labels to correspond to the song's name.
-
Export Audio: Update the WAV backup file and output individual audio files for each song in the desired audio format, e.g., MP3, FLAC, etc.
The Audacity online manual has a page that covers capturing audio from a vinyl record.
(see here)
These steps can be labor-intensive, especially if the album is not in excellent condition. I have often looked at this list of steps and checked to see if a digital copy or CD version of an album is available, and if so, sometimes I have opted to purchase it instead.

Figure 1. Audacity with Album Side Captured in Audio Window
Initial Clean-up
The first step is to find and eliminate any loud clicks and pops from the recording, especially those that exceed the normal volume of the music. Ideally, listen to the audio during the recording, and if any loud clicks or pops are heard, note the approximate time of their occurrence so they can be addressed after the album has finished recording. One effective way to do this is by quickly placing a marker label when a click or pop is heard. Later sections describe how to insert and use Labels. Marking the location can also be done after the recording while listening to it, but it's slightly more efficient during the album recording.
Some cleanup is necessary now because the next step is normalizing the recording's volume. If loud pops are present in the audio, Audacity will normalize the stereo recording incorrectly.
Using Repair to Remove Pops

Figure 2. Using the Repair Feature to Remove a Click
Audacity's Repair function effectively removes individual spikes in the waveform when a click or pop is recorded. In Figure 2, a small click is identified in a quiet recording section. This spike could be addressed later since it is minor, but it is a helpful example. One method to hone in on the exact location of the click or pops is as follows:
-
First, find the audio file's general location by playing back the recording and pausing playback near the desired spot.
-
Then, zoom in and select a portion of the file around where the spike is.
-
Optionally, use the Loop command and playback again, noting the exact location of the spike.
-
Now select the region containing the spike, as shown in Figures 2 and 3. The selection should not exceed 256 samples. Typically, one will need to be "zoomed in" to see the spike clearly and select only a small portion of the waveform.
The command is invoked, as shown in the yellow highlighted menu items in Figure 2. Figure 3 provides a better example of a significant pop. On the left, the original recorded waves display a large spike on the left channel and a smaller one on the right channel. On the right, the repaired waveform completely removes both spikes.

Figure 3. Original Waveform on Left, and Repaired Waveform on Right.
The process of looking for, finding, and confirming that a specific spike is a pop can require zooming in and out of the waveform and playing small audio sections. I find it quicker to use keyboard shortcuts to navigate quickly. For this task, some valuable shortcuts are:
-
Ctrl+1—Zoom In (looks to zoom in about 2x)
-
Ctrl+3—Zoom Out (also seems about 2x)
-
Ctrl+e—First, select a portion of the recorded waveform, then Ctrl+e zooms in to display only the selected portion.
-
Ctrl+f—Display the complete recording in the window.
These zoom functions are also available on the Edit Toolbar.
There is a shortcut to repeat the last command when doing a series of repairs.
-
Ctrl+r—Repeat the most recently used Effect command.
-
L—Toggles the loop mode playback, which repeatedly plays the current selection of the audio file. A button on the Transport toolbar also enables this.
Note: The looping function can help find a specific part of a recording. Figure 1 shows a small section of the recording selected and looping enabled. Placing the cursor within the looped section and selecting play will cause Audacity to play this section continually.
If a significant scratch on the record creates many clicks/pops and, therefore, requires repetitive use of the Repair tool to fix, it may be better to use the Click Removal tool. Click Removal, described later, can clean up a section of audio in one command but is less precise at detecting spikes in the audio.
Next, using the Normalize command is much simpler than Repair. Figure 4 shows how to access the command in yellow highlights, which brings up the dialog box on the left of Figure 4.
Normalize

Figure 4. Menu and Dialog Box for Normalize Command
The Normalize command has two main functions:
-
Remove the DC Offset from the recorded audio. Although I don't recall noticing any DC offset in the recordings, it is prudent to ensure none is present.
-
Increasing the recording volume to near maximum enhances the recording's theoretical dynamic range. However, since normalization also amplifies noise, the recorded dynamic range does not improve until cleanup steps, such as Noise Reduction, are finished.
The Normalize dialog box has two primary settings.
-
The first is the "normalize amplitude," which defaults to -1 dB, slightly below the full range. I leave it as-is.
-
The second option is "Normalize stereo independently." If left unchecked (default), the Normalize command retains the loudness difference between the left and right channels (if any). This command is beneficial for maintaining any intentional imbalance between channels, but if the cartridge or phono preamp has an unintended mismatch, this imbalance is also preserved. In my setup, the left channel appears slightly louder than the right in all recordings, so I checked the box for this option.
At this point, saving the backup file by doing a Save Project file and Export Audio is beneficial, as illustrated in Figure 5. When exporting audio at this stage, set the format to WAV. The Sample Rate should match the value used for recording, Encoding must be set to 32-bit float, and the Export Range should encompass the entire file, as a single backup file is desired.
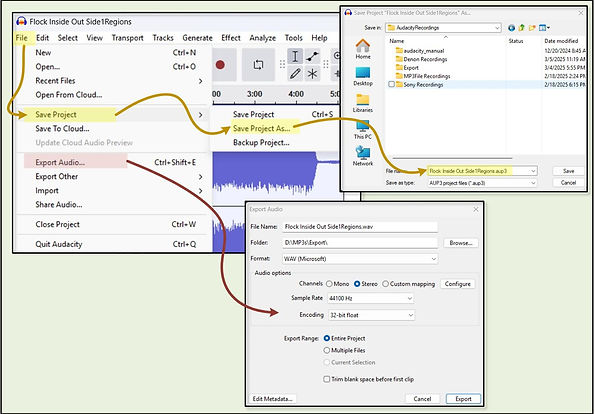
Figure 5. Menu Save Project and Export Audio and Their Dialog Boxes