
The Basics of MultEQ
When enhancing a home theater's audio performance and frequency response, in addition to adjusting speaker placement and room treatments, I also wanted to consider customizing Audyssey's target frequency response. An inexpensive way to tweak Audyssey is using their MultEQ Android/iOS Application (~$20 US). For our media room, using MultEQ enabled a few additional capabilities beyond those provided in the Denon AVR.
The MultEQ application, though not complex or difficult to use, has a user interface that can be unintuitive in some areas. Because of this, it seemed helpful to document (with screenshots) how to use MultEQ and what its capabilities are. The help resources in MultEQ are also very detailed and useful, but can be less convenient. Therefore, this write-up aims to consolidate usage information and include annotated screenshots of important pages within the application.
Last Updated: 10/01/2025
MultEQ Application Basics (using an Android tablet)
Audyssey's MultEQ Android app offers several useful features for room correction, which may justify the app's small cost. The two main benefits (as I see) are:
-
The ability to save and download multiple Audyssey results and profile files to the AVR, including saving them to Google Drive.
-
The ability to adjust the target frequency response curve that Audyssey uses as the reference for computing its correction filter values.
There are several other features, such as setting speaker distance and levels. Still, the two main items allow for creating multiple different frequency profiles and then quickly uploading or changing these profiles with ease. Additionally, saving data in a standard format opens up possibilities for third-party tools to offer enhancements, which would be interesting to explore at some point.
While there are some videos and documentation available to describe MultEQ's user interface, having well-documented, easy-to-read screenshots to help navigate the program would be beneficial in reminding me of some of the nuances of the user interface. The figures below illustrate the main windows within the application.

Figure 1. (a) MultiEQ App Initial Startup Screen and (b) Startup Screen After creating some Audyssey Files

Startup Page
Figure 1a displays a screenshot of the application's initial page when it is first opened. The only real option is to start the Audyssey measurement wizard. After completing one or more sets of measurements, the individual measurement files are shown in this window, as depicted in Figure 1b. A useful item discussed near the end of this section is the Edit button, where file management actions such as copying, uploading, deleting, and renaming are performed.
On the startup page, the main activity is to open an Audyssey file and graphically edit its information. Tapping a file icon opens the main editing screen, as shown in Figure 2. The main menu, with seven options, is centered on the screen. An upload icon is located in the upper left corner, while a Done icon appears in the upper right corner.
Walking Through the Main Menu Options

Figure 2. MultEQ's Main Menu Page.
The core features of MultiEQ are found within various items in the Main Menu, and it's helpful to understand the functions of these items.
Speaker Detection Results: Selecting the first option, "Speaker Detection Results," takes you to a page that displays the settings that Audyssey has determined to be optimal for the room.
In the upper left corner of this screen, there is an "Edit" button (which changes to "Revert" when in edit mode). Clicking "Edit" opens a screen that allows modification of the values set by Audyssey, as illustrated in Figure 3. It's generally recommended to review these values and ensure the following:
-
The speaker configuration should be set to "Small" (assuming that a subwoofer is present), and the crossover frequency should be set to ≥80Hz.
-
Double-check that the speaker levels and distances are reasonable. For example, in the image provided, the subwoofer level was unexpectedly set too high, so it was adjusted to -7dB (based on REW measurements) for a smoother overall response.
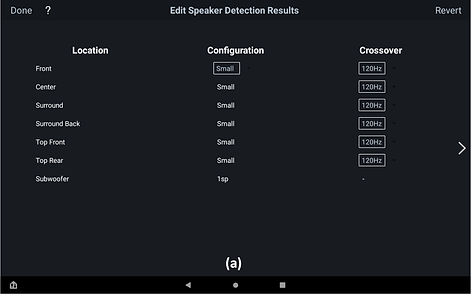

Figure 3. The Speaker Detection Results. (a) Crossover Settings and (b) Distance and Level Settings
The following few options seem less useful (but perhaps not useless).
Correction Results: This page (Figure 4) shows a before-and-after correction frequency response. The after graph is a perfect example created by Audyssey to indicate what Audyssey "thinks" the results of its correction will be, and it does not reflect an actual measurement.
Target Sound Options: Figure 5, Target Sound Options, lets the user choose between two high-frequency roll-off settings. Also, not very useful, but it does alter the high frequency response (slightly?).
Midrange Compensation: This is an intentional dip (amplitude reduction) in the 2 kHz region of the Audyssey target frequency curve which is where the vast majority of tweeter-to-midrange crossovers are. Selecting this option displays a page of on-off switches that enable or disable this feature. (Audibly, I cannot tell the difference, but one can see the effect when measuring frequency response with REW.)

Figure 4. An Example of the The Highly Misleading Correction Results Pages.

Figure 5. Target Sound Options
And now, the next option is both the most useful and the most frustrating one.
The Curve Editor: This feature allows customization of the target frequency response that Audyssey attempts to match. For example, one could boost the low frequencies or increase/cut the high frequencies depending on what the listener prefers. In Figure 6a shows the main menu options available on this page. Figure 6b displays one of the target points being actively edited.


Figure 6. The Curve Editor. (a) Overview of the Window. (b) Actively Editing a Curve Datapoint.
Filter Frequency Range: This setting lets the user limit the frequency spectrum over which MultiEQ makes corrections. Usually, Audyssey sets its correction filters to cover the entire frequency range. If you have a good speaker with a flat frequency response, you can lower the Frequency Range setting, which (hopefully) encourages Audyssey to focus its adjustments on a narrower band, possibly enhancing performance. Figure 7's left image shows the setting for full-range correction, while the right image displays a setting that restricts the correction range to less than 500Hz. The reason for narrowing this range is that the room significantly influences sound below its transition frequency (typically 250Hz-500Hz), whereas above that, the speaker is the dominant factor. Therefore, if you have high-quality linear speakers (debatable in my case😃), Audyssey should be set to prioritize adjusting the room's response (i.e., below the transition frequency). After some experimentation, I ended up leaves the setting at full range.


Figure 7. The Filter Frequency Range Screen. (a) Shows the full range setting, and (b) Shows an example of correction below 500Hz.
Audyssey Settings: The last setting on the main menu displays a page that allows users to turn three Audyssey configuration settings on or off. These settings are:
-
Dynamic EQ is a loudness compensation algorithm that adjusts for variations in human hearing at lower volume levels, where our ears are less sensitive to bass and treble compared to the midrange, according to the Fletcher-Munson curves / equal-loudness contours. Usually I enable this feature, but many "experts" recommend disabling it.
-
Dynamic Volume - Audyssey Dynamic Volume automatically compensates for large swings in loudness, reducing sudden jumps between quiet dialogue and loud effects or commercials by applying dynamic range compression in real-time. It is recommended to disable this.
-
Low Frequency Containment (LFC) - This feature reduces deep bass that easily travels through walls and disturbs others, while psychoacoustic processing preserves the perception of bass impact. This feature is generally recommended to be disabled.
File Upload and File Management
Once all the desired changes have been made to the correction file, press the upload icon on either the startup page (Figure 1) or the correction file main menu page (Figure 2).
After pressing the Upload button, the dialog box shown below in Figure 8 appears. The four actions are:
-
Send to AVR - Selecting this option displays a page listing compatible receivers on the local network, as shown in Figure 9. Selecting a receiver will initiate the file upload and displays a status box showing the progress.
-
Share Link via Google Drive - This option (for me) does not work. Google Drive generates a permission-related error message.
-
Send a Copy - Pressing this item brings up a page (shown in Figure 10). Using a Kindle Fire Tablet brings up a list of applications that can be used to send the selected Audyssey file. The Apps listed are email and file management Apps that are installed on the tablet. Selecting one brings up that App; for example, selecting Google Drive brings up the Google Drive App.
-
Move to - Selecting this option brings up the Google Drive page, as shown in Figure 11. From this page, one can navigate through folders to locate the user's folder where Audyssey Measurement/Correction files are stored. This option appears to be partially redundant, as selecting the Google Drive application in the Send a Copy option can achieve the same result.
Note: For both the "Send a Copy" and "Move to" actions, it appears that MultEQ invokes helper apps. Different devices may open different helper apps, which will look different from the Kindle Fire screenshots. For example, on an Android phone, "Send a Copy" displays a similar but slightly different list of applications, and with "Move to," it jumps to a very similar Google Drive upload screen.

Figure 8. Upload/Transfer File Dialog Box.

Figure 10. Send a Copy App Page.

Figure 9. AVR Selection Page.
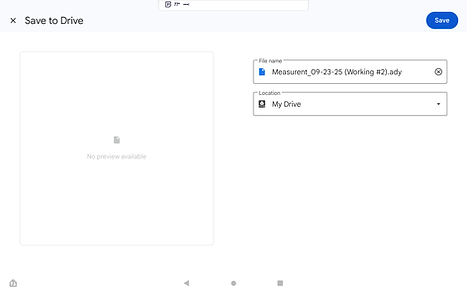
Figure 11. Upload File Dialog Box.
After pressing the "+" button, a dialog box with three options is displayed (see Figure 12). I guess the (unintuitive) reason for the "+" icon is that these options "add files" into the MultEQ application. Of the three options, the last two appear to bring up the same file management page.
-
Create New Curve - This first item (when selected) starts the Audyssey sound measurement wizard, which walks through speaker measurements step-by-step with a detailed on-screen guide. This wizard is very similar to the one that runs on Denon AVRs.
-
Google Drive - This menu item, when selected, displays a file management window that enables you to select a file to transfer into MultEQ. On my tablet, the screen shown in Figure 13 is displayed.
-
Send a Copy - When selected, this option displays the same page as the "Google Drive" option.
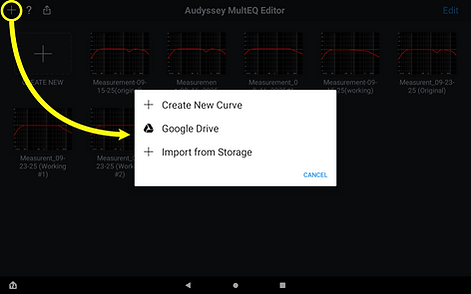
Figure 12. Download/Transfer File Dialog Box.

Figure 13. File Manager for Selecting and Downloading.
So, the remaining file management question is "How do I duplicate, rename, and delete on an Audyssey measurement/correction file?
The answer is in the upper right corner of the startup page, in the menu bar (see Figure 1), where you will find the word "Edit". Selecting this option brings up a screen (Figure 14), which, although not immediately apparent, allows the user to duplicate, delete, or rename.
-
Delete - First select a measurement/calibration graph. Then tap on the trash can icon.
-
Duplicate - Select a measurement/calibration graph and then the "boxed +" icon.
-
Rename - Tap on the title of the measurement/calibration graph to be changed, and a page will be displayed that enables editing of the graph's title.
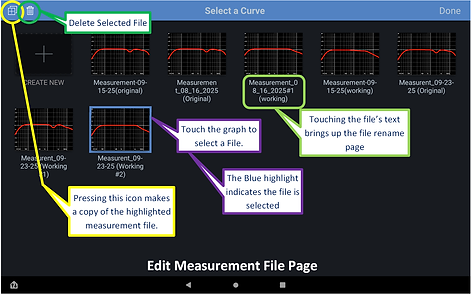
Figure 14. The File Edit Page