

Equipment Connection and Control
After deciding on the equipment and purchasing it, the next step is to connect it. This page details the equipment connection, followed by an overview of the theater's remote control and automation design.
Equipment Connectivity
Last Updated: 09/10/2025
Figure 1 shows the AV equipment connectivity, which is exceedingly straightforward. All source devices connect via HDMI except for the phonograph, which is input via a line-level analog input through the stand-alone phone preamp.
The projector also connects via HDMI. The only long HDMI cable is from the projector to the AVR, which is approximately a 25-foot run. Since the projector is 1080p, the required HDMI bandwidth for 1080p is relatively low (< 10.2 Gbps), and this distance was easily supported via a suitable passive high-speed cable. If and when a 4K projector replaces the current one, a new (probably active) cable will need to be pulled through the walls, which should support ~18 Gbps.
Since the equipment is in a separate room, placing an old spare monitor connected to the receiver's second HDMI output next to the equipment shelves made it more convenient to see the display image from the utility room. Currently, both displays have the same 1080 resolution, so they display the same image. If the main screen were 4K, I'd likely experience some HDMI handshake issues with the display, as I have heard that many receivers struggle to handle multiple different resolution displays correctly.
The ART Phono Plus preamp connection is unique for a home theater setup because I wanted to play records and capture/digitize them. As shown in the upper left portion of Figure 1, the turntable's output goes to the Phono Plus preamp input. Then, the line goes to the Denon AVR, which is obvious. However, the Phono Plus's USB output also connects to a USB port on the PC to support digital capture.
Figure 1's bottom right section shows two receivers. The primary receiver is the Denon AVR, and the Onkyo AVR is used as a two-channel power amplifier to power the rear-height speakers. The Denon AVR's pre-out for the top rear-height speakers is routed to Onkyo's Front BD/DVD input. The AVR is configured as a two-channel external amplifier with all of Onkyo's processing disabled.

Figure 1. Equipment Connection Picture (Ethernet connections not shown)
Not shown (in Figure 1) is the Ethernet/WiFi network interconnection, which is also very simple. Anything that has an Ethernet connector is connected via cabling to a single 16-port GB switch, which connects to a GB Cable Modem via a central WiFi router. The typical recommended network bandwidth for streaming a UHD program is ~25Mbps. Thus, using 1-Gbps Ethernet everywhere results in no network performance issues. The cable modem connection is the limiting factor for streaming bandwidth. With the cable limited to 300Mbps, the maximum simultaneous UHD streams are limited to 10, which is more than enough for my viewing. (For comparison, the maximum bit rate of a UHD Blu-ray is 100-140Mbps over HDMI. )
Network Connection
Too Cheap for a Rack - Equipment Shelves
Last Updated: 10/23/2024
The goals for the equipment rack/shelves were first to be low cost and second to have the equipment not visible to viewers in the room. Some may find the second goal inconsistent because the speakers are not hidden in the room, but the equipment is. The primary justification for hiding the equipment was that it was straightforward since there was a storage room next to the home theater. Also, the equipment has annoying LEDs, which can be very distracting if visible in the room.
There were a few options considered for holding the equipment.
-
Standard equipment rack—This is expensive, and none of the equipment is rack-mountable. However, it is excellent for organizing equipment and cabling.
-
Build or buy a media cabinet—This is less expensive, and we don’t need nice-looking furniture since the equipment will be in the back room. However, depending on the cabinet, wire routing may have limitations.
-
Shelf system, wire, or wood shelving—This is the least expensive solution, easily customizable and installed. However, running and organizing the wiring could also have some limitations.
The decision was to use wire shelving attached to the home theater wall studs. Only two shelves were needed, but additional shelves were installed for extra storage. Some melamine board was laid on top of the wire shelves for better stability on the home theater equipment shelves. To partially mitigate the mess of wiring, every wire as it was installed was clearly labeled. Ultimately, a simple install and inexpensive cost won out over clean-looking shelving and wiring. Figure 2 shows the final mess of equipment.
The equipment in the storage room could make playing a Blu-ray or a record inconvenient. To mitigate the inconvenience, a pass-through, see Figure 3, was implemented using a tiny Blu-ray player housed in a thick backer box. However, later, when a 4K player and a turntable were purchased, I should have made the pass-through bigger. So far, this has not been done.

Figure 2. Avoiding Pricey Equipment Rack to Use Inexpensive and Very Messy Shelves
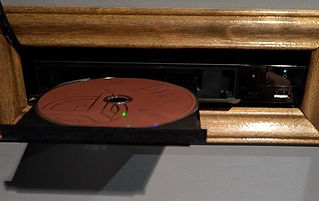
Figure 3. Blue-ray disc pass-through
Remote Control and Automation Overview
Last Updated: 09/04/2024
The implementation of the automation for this room has undergone several iterations and likely will continue to evolve. Initially, I had a cable TV and Blu-ray-centric theater and used a tablet-based remote (called Roomie Remote). While this system worked well, it was a little complex to set up and maintain, but it was highly customizable. However, a flexible hard remote that includes network, Bluetooth, and IR is much preferred.
This motivated a move to the Harmony Elite Remote and a Harmony Hub, which (at the time) could be linked to Smartthings hub for lighting control and to Amazon's Alexa/Echo for voice control of both the AV equipment and lighting, assuming the integrations work, which at the time of this writing many do not.
Automation Goals
Figure 4 shows the interconnection of the services, but before proceeding, it is useful to summarize the desired automation requirements for this theater.
Control AV equipment to play movies, music, and streaming media. Turn on/off and configure equipment depending on the activity.
-
Convenient and flexible manual control of lights from within or outside the theater.
-
Automated control lighting is used when entering/leaving the room, and/or control lighting is used when starting/stopping media. For example, full lighting is used when entering/exiting the room, dim lighting is used when equipment is powered on, and lights are off when playing media.
-
Able to control the theater from other locations in-house, so start the equipment before arriving at the theater room.
-
Primary control is via dedicated remote and phone/tablet; secondary control is via voice control.
-
No control of the projector screen is needed since it is a fixed screen.
-
The home theater should be automated like the rest of the house, which uses Amazon's Alexa and
SmartThings.

Figure 4. Simplified Diagram of HT Automation Architecture
Implementation Overview
The Harmony Elite was an obvious choice to handle AV control (at the time), and this remote interoperates with Alexa and SmartThings. These three form the basis of the automation. See Figure 4.
Slight digression—The Harmony Remote is no longer being sold. Direct remote functions continue to work, but some third-party services for Harmony have stopped working. Further, some Alexa/Echo integrations don't seem to work. Figure 4 shows this by dotted-grey arrows between clouds.
-
The Alexa skill for Harmony does not work. Not a priority.
-
Harmony to/from SmartThings to control lighting stopped working.
-
Alexa skill for Nvidia Shield: I cannot get this to work.
-
Other Harmony and Alexa integrations don't seem to exist (e.g., control/sense AVR or Blu-ray player status).
Audio and Video Automation
Figure 5. Screenshot of Harmony Activities

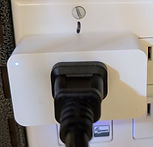


Figure 6. Z-Wave Smartplug (Top), Remote Button (bottom left), and Zigbee Door Sensor (right)
The Harmony Remote and Hub handle both audio and video controls. The Harmony activity setup and automation were kept simple. The programming for all the activities is similar. Turn on the AVR, turn on the projector, select the correct input, and turn on the desired source. The AVR controls volume. The programmed activities (see Figure 5) are the following:
-
Watch Nvidia Shield, which is the primary streaming source.
-
Play a vinyl record. (Only activity where the projector is not turned on.)
-
Watch PC, e.g., play video, music, audio capture, and measurement.
-
Play a Blu-ray or 4K UHD Blu-ray.
Lighting Control
As mentioned, lighting control is via the Smartthings Hub. (now made by Aeotec). Some of these automations could have been triggered via Harmony, but the SmartThings-Harmony integration no longer functions. Some of the desired automations proved too inflexible (they did not turn on/off at the right time or were limited due to a lack of practical triggers). The automations that were useful and were implemented were:
-
SmartThings Button (Figure 6) Automation: Programmed a remote button with three actions.
-
Single Press: Turn on/off the dimmed sconces.
-
Double Press: Turn on/off of recessed lights & sconces.
-
Hold Press: Turn on/off rope lights.
-
-
SmartThings Entrance Door Automation: This uses a door sensor (Figure 6) to turn on all recessed lights when the closed door opens. It also uses a power sensor monitoring the AVR only to perform this automation when the AVR is off. (This won't run if the door is already open. Using a motion or presence sensor instead of a door sensor would eliminate this issue.)
-
SmartThings AVR Automation: How do you detect when the equipment is running? The AVR and projector have a 12V trigger output, but this isn't easy to interface to Smartthings, so a power monitor was used instead. The AVR's standby power is 5W, so if the AVR's power exceeds about 10-20W, it is "on," and the automation is triggered. Then the following occurs:
-
Turn on the Ceiling Light (in case it is not already on), and 45 seconds later, turn it off. (The projector takes about 40 seconds to warm up.)
-
Turn on the Sconces (for low-level lighting) after 47 seconds, which can be manually turned off via the button.
-
-
Alexa Integration: Voice commands to control lighting are possible by enabling the SmartThings skill in the Alexa app. One needs to make sure the names of lights and scenes are unique and remember them when speaking a command. This can be tricky when one has 60-70 devices throughout the house.
It would be nice to create an automation without much programming based on when media starts/stops playing or which source the AVR selects. This would enable some better lighting control options, but at this time, it appears not worth the effort (or perhaps not even possible). Figure 7 shows the automations in SmartThings that were described above.


Figure 7. Smartthings Automations
Alternatives to Harmony Remote Controls
Since Logitech ceased manufacturing its remote controls in 2021, it has been challenging to find a remote control with capabilities similar to those of the Harmony Elite. It does not require an installer to program (e.g., Control 4). So far, the most flexible Elite-like remote replacements that I have found so far are these (but I have not used them):
-
Unfolded Circle's Remote 3
-
SofaBaton's X1S and the more refined and flexible SofaBaton X2
-
Haptique RS90 Smart Remote
-
RTI's ISR-2 - 2.8" Intelligent Surface Remote (requires dealer installation)
-
AVA Cinema Remote (requires dealer installation)
-
A selection of Onforall remotes (not in the same league as the above two).
Last Updated: 01/04/2026