

Trim and Helpful Accents
This page features some photos, primarily taken after the theater's completion, showcasing some trim details added to enhance the room's convenience for its occupants.
Click on an Image to See a Larger Version

Tablet Remote Holder
The original remote control for the home theater was purely tablet-based (e.g., iPad), and I wanted a place to store the remote when it was not in use. I added a small holder to the wall next to the main seating row for easy access. When the remote was upgraded to the Harmony Elite, which includes a hard remote with physical buttons, I placed it on its charging stand on the half-wall. This is the remote we use most often, but the Harmony hub also supports using a tablet app, so the holder can still be used, as shown in the photo. However, we mainly use the hard remote now.
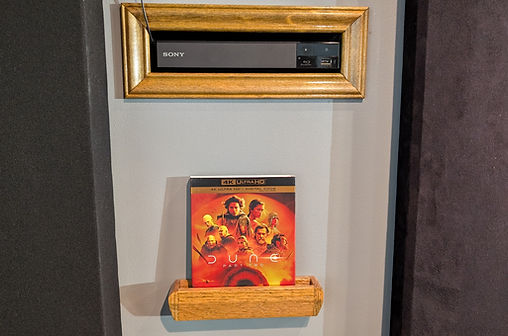
Blue Ray Disk Holder
A small pass-through opening for a Blu-ray player was added to the room to start a Blu-ray without leaving. To achieve sound isolation, the back of the opening is a fully enclosed box where the player sits. Due to the arrangement of the acoustic panels on this part of the wall, less than 12 inches of width was available for the pass-through. The Sony S3700 was chosen partly because it is nine inches wide, allowing it to fit within the available ~12 inches. This is shown in the upper portion of the photo. Once the disc is loaded, what should be done with the case? A small shelf was added below the player to hold the Blu-ray case for the currently loaded disc, addressing this minor issue. I have considered upgrading the pass-through, but because UHD players are physically wider—for example, the UB420 is 12.5 inches—this would require redoing the box and cutting a larger opening, which I have not done so far.

Oak Door and Media Case
The rear left corner of the theater is a semi-dead space. The idea was to add some cabinets to this area, but this has not been completed. The black media case is in this corner, and a small set of shelves hangs on the wall. The top shelf can contain snacks, while the bottom has space for one of the room's subwoofers. The left side of the picture shows the finished entry door. This is a solid Oak door that is tightly sealed, providing some reasonable sound insulation. This area still seems a bit underwhelming and requires further improvement. I could use some additional cabinetry to fill in the unused space. I am unsure what would work in this space.

Snack Shelf for the Recliners
In the primary seating row, the relatively inexpensive recliners have cupholders but no place for snacks, so I added a shelf next to the armrests of the recliners on each side of the row. The left side of this picture shows the shelf on the right side, and the left shelf is attached to the wall. (Ok, that isn't very clear.) The Z-Wave lighting remote control is the small white object on the right-hand side shelf, located on the left side of the photo.

Wood Beam for ATMOS Front Heights
Adding front Atmos-height speakers occurred several years after the home theater was completed. The original idea was to place Atmos speakers onto the ceiling rather than embed them within it. This picture shows a faux beam with the speakers embedded. This approach looked cleaner and allowed us to hide the wiring more easily inside the wood beam. The beam was constructed in three main pieces: the two ends and the center section to which the speakers are attached. This middle section was fastened to some wood plates, which in turn were screwed into the ceiling. The wooden beam also serves as the cabinet for the speakers.