

Appendix: Special Topics-Brightness
Continuing from the previous page, this page offers more detailed information and calculations on Projector and Flat Panel brightness specifications, how they are defined, and how manufacturers use these definitions to specify projectors and flat panels. Hopefully, this makes sense and is correct, but if you find issues with this description, you can always berate me by using this form.
Projector (and Flat Panel) Brightness
Last Updated: 09/19/2024
Lumens, Nits, etc.
When deciding on a projector, I did not consider whether its light output met the room's needs. However, since the room is fully light-controlled, the screen size is not large, and HDR was not a consideration at the time, there was little risk that a typical home theater project would not be bright enough. However, it is more accurate to measure the projector's and screen's reflected light output and determine whether it is sufficient.
How bright should the light reflected off a screen be? This information is not easy to find. SMPTE has a specification for SDR in theaters that states the light level should be between 41 and 75 nits. Some other sources recommend around 50 nits for SDR and suggest that HDR for projectors should be around 100-200 nits. Since my "out-of-date" theater only supports SDR, the example calculations below assume SDR.
Lumen—This measures the total volume of light emitted from an object. For example, in the case of a light bulb, it is the total amount of light emitted in all directions. One Lumen was initially defined as the total light emitted by one wax candle. (More recently, standards have defined the reference light source more precisely.) Wikipedia offers a short, precise definition.
ANSI Lumen—This refers to a specification that defines a precise method for measuring Lumens from a projector to a projection screen. ANSI lumens are defined in IT7.215. The above Wikipedia link also includes a detailed definition of this parameter. ANSI lumens are generally considered a more accurate measure of a projector's performance.
Nit—Known by international standards as a candela per square meter (symbol: cd/m2), it is a unit of luminance. A candela is a measure of luminous intensity in a particular direction from a source. A nit measures luminous intensity over an area of 1 square meter. Wikipedia provides a short, precise definition.
foot-Lambert—One foot-lambert is defined as the luminance of a surface that reflects light uniformly in all directions and has a brightness equal to one lumen per square foot. Mathematically, this can be expressed as the equation below. This equation accounts for the light being distributed over a solid angle.

The conversion between fL and nits is:


Figure 1. Simplified Pictorial Definitions for Lumens and Nits
Where 0.0929 is the conversion factor between square meters and square feet.
It is easier (at least for me) to understand the concepts of the above parameters by using a few simple pictures. Figure 1 shows four pictures; the left shows lumens, and the right describes nits (aka cd/m2). The top two show these parameters for a light bulb, and the bottom two show how these parameters apply to display devices.
A projector's luminance is typically specified using lumens, perhaps because the actual nit specification depends on the screen size. Flat panel displays specify brightness nits.
Calculate a Projector and Screen's Light Output
The screen dimensions are given as 56 inches by 100 inches. First, we should convert these dimensions from inches to meters and then calculate the area in square meters and square feet as:

Next, we plug in the projector's light output into the below formula to convert lumens to nits, assuming a screen gain of 1.0:

Where the Area is the screen’s area in square meters, and Gain is the screen gain specification.
Less commonly used, we can calculate the luminosity in foot-Lamberts as follows:

If the screen gain is not 1.0, the above results are scaled by the screen gain. The manufacturer of my screen specified a screen gain of 1.3. For a 1.3 screen gain, the brightness scales to 182 nits or 53.48 fL.
Projector Central's calculator estimates a brightness of 113 nits for the above 56 x 100-inch 1.0 gain screen. This difference is because the above equations do not account for the light loss caused by using the projector’s zoom to size the image properly. This loss can be estimated to be around 20%. They are factoring this into the above (i.e., 0.8 x 141) results in ~113 nits.
Based on the requirements at the beginning of this section, the light output from the screen should be enough. However, the 113 nits is still optimistic because it does not include the projector bulb's dimming over the bulb's life. During the first 100 hours of use, considered the break-in time, a bulb can lose about 20% of its original light output. So even with this, it appears the projector provides enough output. If this were an HDR projector, the projector output would be marginal.
Wavelength of Sound
Last Updated: 09/19/2024
It can be useful to have a concept of the wavelength of sound at different frequencies. For example, 20Hz has a wavelength of about 56 feet (17 meters), which is longer than a typical home cinema room. Figures 2 and 3 show a plot of wavelength versus frequency (blue line). These figures also show (in green) the quarter-wavelength, which can be helpful when determining, based on a speaker's distance from a wall, at which frequencies boundary interference may occur. These graphs are calculated using the equation: Wavelength = Frequency/Velocity. The velocity of sound varies with temperature and elevation, but for these graphs, the velocity is assumed to be 1125 ft/sec (343 m/s).

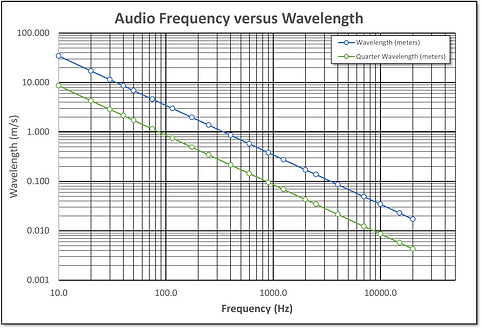
Figure 2. Wavelength in Feet Versus Frequency
Figure 3. Wavelength in Meters Versus Frequency
Calculating the Riser Height
Last Updated: 09/02/2024
In a two-row home theater, the second row must be raised to ensure the screen has a clear line of sight. Alternatively, the screen can be raised if one has room above it, but this usually results in uncomfortable sightlines. (The viewer has to look up.)
A simple approach to estimating the riser's height is to treat the second-row sightline as part of two triangles. This is shown in Figure 5 with the purple dotted lines. One triangle's hypotenuse is from the back row viewer's eyes to the bottom of the screen, and the two sides of this triangle are the back row viewer's distance from the screen and his eye height above the bottom of the screen. The second similar triangle is based on the front-row viewer's height and distance from the screen. The riser height calculation uses the ratio of these two triangles to determine how high the back-row viewer's eyes need to be.
The picture in Figure 5 below is the derivation of the equations used to calculate the riser height. The result is Equation #4, which describes riser height as the ratio of the distance from the screen of each row times the difference in the height of each row (without the riser). The height of each row can be measured reclined or not. I went with not reclining for both rows.
Equation 4 can be simplified, assuming that the front row is halfway between the second row and the screen and that the seat/viewer height is roughly the same for both rows (HT1 and HE1 in Figure 5). The riser height is the difference between the height of the front row (at the top of the viewer's head) and the bottom of the screen.
For this home theater, HT1 (front row height) is ~42 in., and SF (bottom of screen) is ~30 in. Thus, the approximate riser height should have been ~12 in.

Figure 5. Riser height triangles and detailed equations to derive a formula to estimate back row height.